
Note
New to DeepInverse? Get started with the basics with the 5 minute quickstart tutorial..
5 minute quickstart tutorial#
Follow this example to get started with DeepInverse in under 5 minutes.
Contents
1. Install#
First, install and import the latest stable release of deepinv:
pip install deepinv
uv pip install deepinv
pixi add --pypi deepinv
conda install -c conda-forge deepinv
We then get the device (CPU in the case of this example).
import deepinv as dinv
import torch

device = dinv.utils.get_device()
Selected GPU 0 with 10679.25 MiB free memory
2. Physics#
In DeepInverse, x are images:
x = dinv.utils.load_example("butterfly.png", device=device)
Images are tensors of shape B, C, ... where B is batch size, C are channels and ... are spatial dimensions:
print(x.shape)
torch.Size([1, 3, 256, 256])
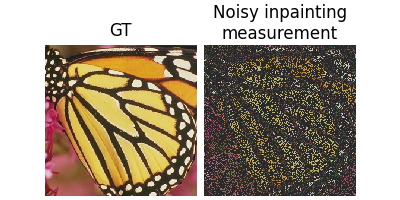
Imaging forward operators are called physics and simulate
measurements y from x.
DeepInverse implements many different types of physics across various imaging modalities. Physics also possess noise models such as Gaussian or Poisson noise.
Hint
Do you get a matplotlib LaTeX error when plotting? Disable LaTeX using dinv.utils.disable_tex()
physics.noise_model = dinv.physics.GaussianNoise(sigma=0.1)

y = physics(x)

dinv.utils.plot({"GT": x, "Noisy Inpainting \nMeasurement": y})
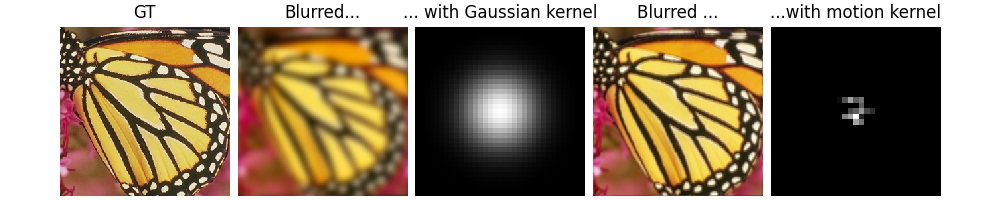
Many physics also take
physics parameters such as mask, filter, sigma etc.:
# Blur with Gaussian filter parameter
filter = dinv.physics.functional.gaussian_blur(sigma=(5, 5))

physics = dinv.physics.BlurFFT(x.shape[1:], filter=filter, device=device)

# Simulate measurements
y = physics(x)
You can easily use your own params by passing these into the physics,
or you can use a generator to generate random params:
# Blur kernel random generator
physics_generator = dinv.physics.generator.MotionBlurGenerator(
    psf_size=(31, 31), num_channels=3, device=device
)

# Generate a dict of random params {"filter": ...}
params = physics_generator.step()

# Update physics during forward call
y2 = physics(x, **params)

dinv.utils.plot(
    {
        "GT": x,
        "Blurred...": y,
        "... with Gaussian kernel": filter,
        "Blurred ...": y2,
        "...with motion kernel": params["filter"],
    }
)
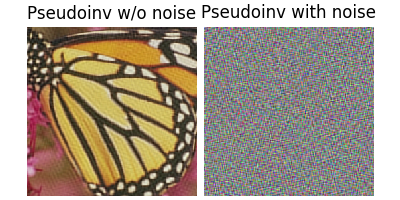
Physics are powerful objects and have many methods, for example a pseudo-inverse:
# You can also update params like so
physics.update(filter=filter.to(device))

x_pinv = physics.A_dagger(y)
As it is well-known in the field of inverse problems, the pseudo-inverse can give good results if the problem is noiseless, but it completely fails in the presence of noise - this is why we need reconstructors!
physics.noise_model = dinv.physics.GaussianNoise(sigma=0.1)

y = physics(x)

x_pinv_noise = physics.A_dagger(y)

dinv.utils.plot(
    {"Pseudoinv \nw/o noise": x_pinv, "Pseudoinv \nwith noise": x_pinv_noise}
)
Tip
Want to use DeepInverse with your own physics operator? Check out Bring your own physics for a tutorial!
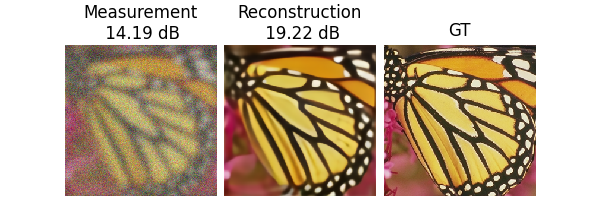
3. Models#
In DeepInverse, a model is a reconstruction algorithm that
reconstructs images from y and knowledge of physics.
Tip
Many models, such as Reconstruct Anything Model, are pretrained reconstructors and can
be used out of the box. See Use a pretrained model for a full example.
Plot the image x, the measurement y and the reconstructed image
x_hat and compute metrics:
metric = dinv.metric.PSNR()

psnr_y = metric(y, x).item()
psnr_x_hat = metric(x_hat, x).item()

dinv.utils.plot(
    {
        "Ground Truth": x,
        "Measurement": y,
        "Reconstruction": x_hat,
    },
    subtitles=["PSNR:", f"{psnr_y:.2f} dB", f"{psnr_x_hat:.2f} dB"],
)
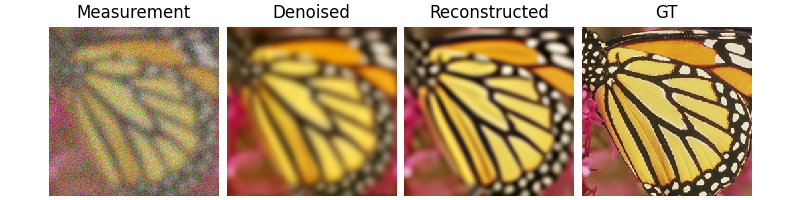
Some models are only denoisers that denoise
images from y and sigma, which can be used to build many
model-based reconstruction algorithms.
denoiser = dinv.models.DRUNet(device=device)

x_denoised = denoiser(y, sigma=0.1)

model = dinv.optim.DPIR(sigma=0.1, denoiser=denoiser, device=device)

x_hat = model(y, physics)

dinv.utils.plot(
    {
        "Ground Truth": x,
        "Measurement": y,
        "Denoised": x_denoised,
        "Reconstruction": x_hat,
    },
    subtitles=[
        "PSNR:",
        f"{dinv.metric.PSNR()(y, x).item():.2f} dB",
        f"{dinv.metric.PSNR()(x_denoised, x).item():.2f} dB",
        f"{dinv.metric.PSNR()(x_hat, x).item():.2f} dB",
    ],
)
DeepInverse covers many frameworks of reconstruction algorithms including deep model architectures, iterative algorithms, sampling algorithms (e.g. diffusion models), and unfolded models.
# Reconstruct Anything Model foundation model
model = dinv.models.RAM(pretrained=True, device=device)
Tip
Want to use DeepInverse with your own network? Just inherit from the reconstructor base class deepinv.models.Reconstructor!
4. Datasets#
You can use DeepInverse with dataset, for testing or training. First, define a ground-truth dataset. We implement wrappers for many popular imaging datasets across domains including natural images, medical imaging, satellite imaging, etc.
Tip
It’s easy to use your own dataset with DeepInverse. See Bring your own dataset for a tutorial.
dataset = dinv.datasets.SimpleFastMRISliceDataset(
    "data", anatomy="brain", download=True
)
  0%|          | 0/820534 [00:00<?, ?it/s]
100%|██████████| 801k/801k [00:00<00:00, 38.0MB/s]
Datasets return either x, tuples x, y or x, y, params of images,
measurements, and optional physics parameters. Given a ground-truth
dataset, you can simulate a dataset with random physics:
physics = dinv.physics.MRI(device=device)

physics_generator = dinv.physics.generator.RandomMaskGenerator(
    (320, 320), device=device
)

path = dinv.datasets.generate_dataset(
    dataset,
    physics,
    save_dir="data",
    physics_generator=physics_generator,
    device=device,
)

dataset = dinv.datasets.HDF5Dataset(path, load_physics_generator_params=True)
Dataset has been saved at data/dinv_dataset0.h5
/local/jtachell/deepinv/deepinv/deepinv/datasets/datagenerator.py:179: UserWarning: Neither 'split' nor 'train' parameters are provided. Defaulting to loading the 'train' split. This behaviour is likely to change in future versions of the library.
  warn(
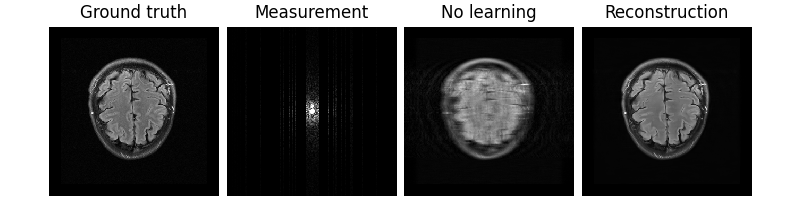
You can use this dataset to test or train a model:
/local/jtachell/deepinv/deepinv/deepinv/training/trainer.py:541: UserWarning: Update progress bar frequency of 1 may slow down training on GPU. Consider setting freq_update_progress_bar > 1.
  warnings.warn(

  0%|          | 0/2 [00:00<?, ?it/s]
Test:   0%|          | 0/2 [00:00<?, ?it/s]
Test:   0%|          | 0/2 [00:00<?, ?it/s, PSNR=41.6, PSNR no learning=31.7]
Test:  50%|█████     | 1/2 [00:00<00:00,  2.92it/s, PSNR=41.6, PSNR no learning=31.7]
Test:  50%|█████     | 1/2 [00:00<00:00,  2.92it/s, PSNR=41.6, PSNR no learning=31.7]
Test:  50%|█████     | 1/2 [00:00<00:00,  2.92it/s, PSNR=40.6, PSNR no learning=30.6]
Test: 100%|██████████| 2/2 [00:00<00:00,  2.80it/s, PSNR=40.6, PSNR no learning=30.6]
Test: 100%|██████████| 2/2 [00:00<00:00,  2.82it/s, PSNR=40.6, PSNR no learning=30.6]
Test results:
PSNR no learning: 30.607 +- 1.059
PSNR: 40.637 +- 0.995

{'PSNR no learning': 30.606558799743652, 'PSNR no learning_std': 1.0593370155166741, 'PSNR': 40.63715362548828, 'PSNR_std': 0.9948498255997681}
Tip
Want to use DeepInverse with your own dataset? Check out Bring your own dataset for a tutorial!
🎉 Well done, you now know how to use DeepInverse!
What’s next?#
Try more basic examples, including how to inference a pretrained model, how to use your own dataset, or how to use your custom physics operator.
Checkout a YouTube tutorial on our YouTube Channel.
Dive deeper into our full library of examples.
Read the User Guide for further details on the concepts introduced here.
Want help? Open an issue ask a message on our Discord or get in touch with our MAINTAINERS.
Total running time of the script: (0 minutes 10.276 seconds)